Ultrasonic Sensor HC-SR04 with Arduino Tutorial

Ultrasonic Sensor HC-SR04 with Arduino Tutorial

You will learn how to interface Ultrasonic Sensor HC-SR04 with Arduino. It can be an Ultrasonic Range Sensor or any purposes.

ABOUT THIS PROJECT-

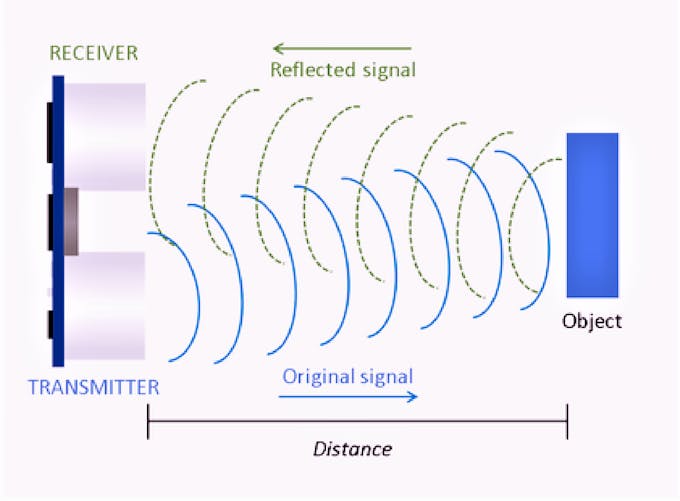
Ultrasonic Sensor HC-SR04 is a sensor that can measure distance. It emits an ultrasound at 40 000 Hz (40kHz) which travels through the air and if there is an object or obstacle on its path It will bounce back to the module. Considering the travel time and the speed of the sound you can calculate the distance.

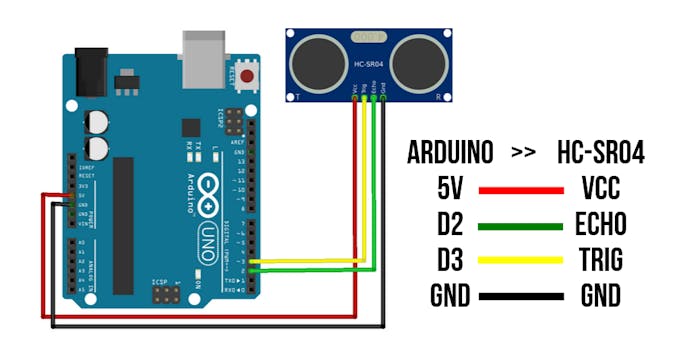
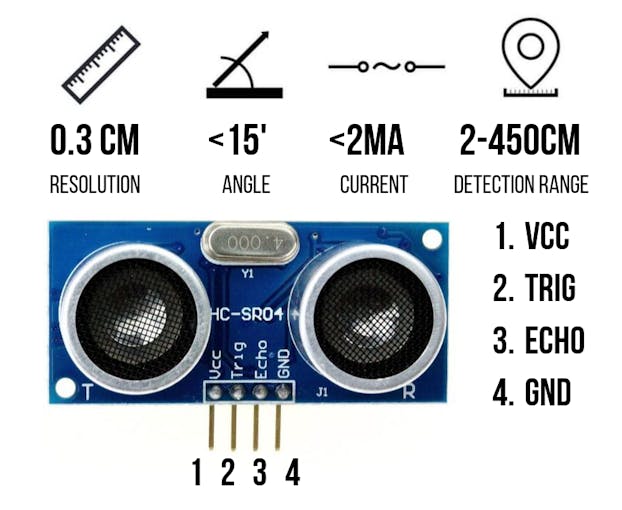
The configuration pin of HC-SR04 is VCC (1), TRIG (2), ECHO (3), and GND (4). The supply voltage of VCC is +5V and you can attach TRIG and ECHO pin to any Digital I/O in your Arduino Board.

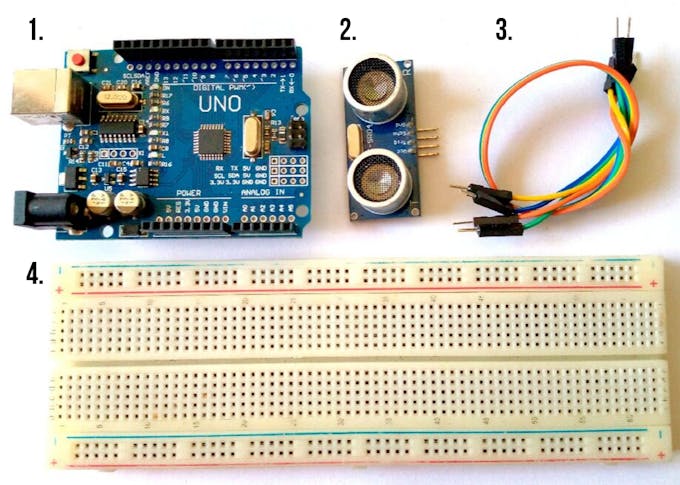
The materials that we need to make this project:

1. Arduino UNO R3 CH340 (you can use any Arduino Boards)

2. Ultrasonic Sensor HC-SR04

3. Male to Male Jumper Wires

4. Breadboard


The connection of Arduino and Ultrasonic Sensor HC-SR04

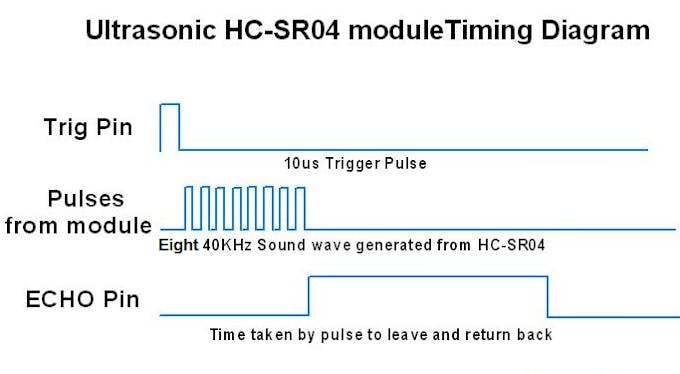
In order to generate the ultrasound we need to set the Trigger Pin on a High State for 10 µs. That will send out an 8 cycle sonic burst which will travel at the speed sound and it will be received in the Echo Pin. The Echo Pin will output the time in microseconds the sound wave traveled.

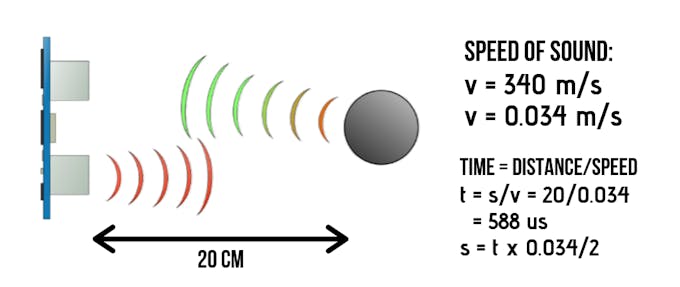
For example, if the object is 20 cm away from the sensor, and the speed of the sound is 340 m/s or 0.034 cm/µs the sound wave will need to travel about 588 microseconds. But what you will get from the Echo pin will be double that number because the sound wave needs to travel forward and bounce backward. So in order to get the distance in cm we need to multiply the received travel time value from the echo pin by 0.034 and divide it by 2.

For the programming code, first we need to define the Trigger Pin and Echo Pin that connected to Arduino board. In this project EchoPin is attached to D2 and TrigPin to D3. Then define variables for the distance (int) and duration (long).

In the loop first you have to make sure that the trigPin is clear so we have to set that pin on a LOW State for just 2 µs. Now for generating the ultrasound wave we have to set the trigPin on HIGH State for 10 µs. Using the pulseIn()function you have to read the travel time and put that value into the variable “duration”. This function has 2 parameters, the first one is the name of the echo pin and for the second one you can write either HIGH or LOW. In this case, HIGH means that the pulseIn() function will wait for the pin to go HIGH caused by the bounced sound wave and it will start timing, then it will wait for the pin to go LOW when the sound wave will end which will stop the timing. At the end the function will return the length of the pulse in microseconds. For getting the distance we will multiply the duration by 0.034 and divide it by 2 as we explained this equation previously. At the end we will print the value of the distance on the Serial Monitor.

Steps :

1. First do the wiring as shown in the picture

2. Open Arduino IDE Software and write down your code, or download the code below and open it

3. Choose your own Arduino board (in this case Arduino Uno), by selecting Tools > Board > Arduino/Geniuno Uno

4. Choose your COM Port (usually it appears only one existing port), Tools > Port > COM.. (If there are more than one ports, try it one by one)

5. Upload your code by pressing Ctrl + U or Sketch > Upload

6. To display the measurement data you can use Serial Monitor by pressing Ctrl + Shift + M (make sure that the baudrate speed is 9600)


Results:

After uploading the code, display the data with Serial Monitor. Now try to give an object in front of the sensor and see the measurement.


For the consideration, you can use your manual tape meter to measure the distance and compare it with the distance on Serial Monitor. If you want to display it on LCD, you can follow the second wiring diagram and upload the code below.
CODE

Ultrasonic Sensor HC-SR04 with Arduino Code for Ranging TestC/C++
Write your code in Arduino IDE Software, save it. Select the port (i.e COM3) and choose your Arduino board type (i.e Arduino Uno / Genuino) then compile it to your Arduino.
// ---------------------------------------------------------------- //
// Arduino Ultrasoninc Sensor HC-SR04
// Re-writed by Arbi Abdul Jabbaar
// Using Arduino IDE 1.8.7
// Using HC-SR04 Module
// Tested on 17 September 2019
// ---------------------------------------------------------------- //

#define echoPin 2 // attach pin D2 Arduino to pin Echo of HC-SR04
#define trigPin 3 //attach pin D3 Arduino to pin Trig of HC-SR04

// defines variables
long duration; // variable for the duration of sound wave travel
int distance; // variable for the distance measurement
void setup() {
  pinMode(trigPin, OUTPUT); // Sets the trigPin as an OUTPUT
  pinMode(echoPin, INPUT); // Sets the echoPin as an INPUT
  Serial.begin(9600); // // Serial Communication is starting with 9600 of baudrate speed
  Serial.println("Ultrasonic Sensor HC-SR04 Test"); // print some text in Serial Monitor
  Serial.println("with Arduino UNO R3");
}
void loop() {
  // Clears the trigPin condition
  digitalWrite(trigPin, LOW);
  delayMicroseconds(2);
  // Sets the trigPin HIGH (ACTIVE) for 10 microseconds
  digitalWrite(trigPin, HIGH);
  delayMicroseconds(10);
  digitalWrite(trigPin, LOW);
  // Reads the echoPin, returns the sound wave travel time in microseconds
  duration = pulseIn(echoPin, HIGH);
  // Calculating the distance
  distance = duration * 0.034 / 2; // Speed of sound wave divided by 2 (go and back)
  // Displays the distance on the Serial Monitor
  Serial.print("Distance: ");
  Serial.print(distance);
  Serial.println(" cm");
}

Comments

Popular posts from this blog

HackerRank Tuples Solution in Python

  HackerRank Tuples Solution in Python Task Given an integer,n, and n  space-separated integers as input, create a tuple, t, of those n integers. Then compute and print the result of hash(t). Note:   hash()  is one of the functions in the  __builtins__  module, so it need not be imported. Input Format The first line contains an integer,n, denoting the number of elements in the tuple. The second line contains n space-separated integers describing the elements in tuple t . Output Format Print the result of  hash(t) . Sample Input 0 2 1 2 Sample OUTPUT- 3713081631934410656 n = int(input()) int_list = [int(i) for i in input().split()] int_tuple = tuple(int_list) print(hash(int_tuple))

How to check if the given number is Even or odd-

1. How to check if the given number is Even or odd- We can determine whether a number is even or odd. This can be tested using different methods. The test can be done using simple methods such as testing the number’s divisibility by 2. If the remainder is zero, the number is even. If the remainder is not zero, then the number is odd. The following algorithm describes how a C program can test if a number is even or odd. CODE:- #include <stdio.h> int   main () { int num;//variable declaration printf("Enter any num: ");// take input from user  scanf("%d",&num);// declare input if(num%2==0) { printf("The num %d is even",num); } else { printf("The num %d is odd",num); } return 0; }     ALGORITHM:- Step 1.   Start Step 2 .   Enter a number. Step 3.   If...

Binary to Decimal conversion program

  3. Binary to Decimal conversion program using C language:- The C program converts binary number to decimal number that is equivalent. A decimal number can be attained by multiplying every digit of binary digit with a power of 2 and totaling each multiplication outcome. The power of the integer starts from 0 and counts to n-1 where n is assumed as the overall number of integers in a binary number. Ex:-   ( 101100001 ) 2 =( 353 )10                                                  ALGORITHMS:- Step 1:  Start Step 3:  The user is asked to enter a binary number as an input Step 4:  Store the quotient and remainder of the binary number in the variable rem Step 5:  Multiply every digit of the entered binary number beginning from the last with the powers of 2 correspondingly Step 6:  Repeat the above step...